

Epochs and measures (what epochs are for)
Within Mood, an epoch is a period of time, for example, 2013, July 2013 or Phase 1. Epochs are used by measures and give you measure instances for epochs, for example:
- Project.Cost.Jan 2013
- Project.Cost.2012
- Project.Cost.Phase 1
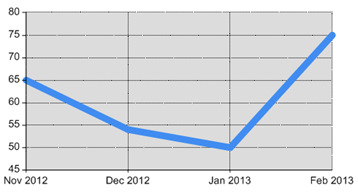
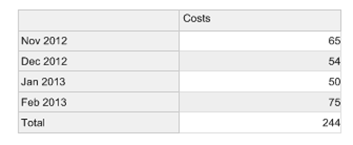
Each of these measure instances holds the measure’s value for that epoch. This allows you to measure and represent performance over time. For example, the following Line chart and Aggregation matrix both use the same measure instances:
If a measure type is epoch aware, when you apply that measure to an element, you get to select the epochs that measure instances will be created for. You can choose between standard calendar epochs (months and years) and custom epochs.
Calendar epochs and custom epochs – the Epochs library As shown in the next image, Business Architect’s Explorer Bar has an Epochs library that includes default calendar epochs, and any custom epochs that have been defined (by default, none are included).

By default, each repository includes a forty year span of month and year epochs (twenty years plus and minus today). These are the only epochs supplied as standard. You can use the Configure Epochs dialog box to control the span generated (see page 9 for details on this dialog box). Epochs are elements. This means that a year epoch is the parent of its months, and all months are siblings of each other (the Find sibling epochs query construct relies on this, and if you have a month epoch, Find Parent will give you the year).
Note: Although there are no day, week or quarter epochs supplied as standard, if you are creating an Aggregation matrix, several Date Grouping levels are available, including, for example, Day of Week, Week Commencing and Quarter Name.
You can create custom epochs for specific periods of time or for abstract state changes. For example, project phases each lasting 10 weeks, or product maturity phases. Points to note about custom epochs:
- Custom epochs must belong to an epoch group. Hence, you must add at least one epoch group before you can add a custom epoch.
- To create a custom epoch, you simply add one, give it a meaningful name and, if required, set its start and end date. Custom epochs do not have to include dates. For example, you might have four project phases that are applicable to all projects.
- If you use custom epochs with an epoch modifier, the modifier relates to the order of the custom epochs within their group. You can move custom epochs within an epoch group.
The current epoch
MooD always has the concept of the current epoch. This defaults to the current month (you can change this), and it is widely available for use within Business Architect as <the current epoch>. It is the default working epoch and you can include it in queries.
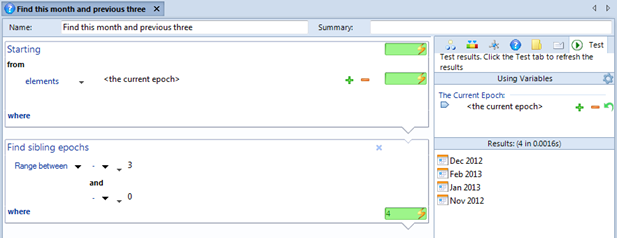
The following example illustrates the usefulness of this concept. In this query, <the current epoch> is used as a starting point to find the current month and the previous three.
Queries like this one are the basis for many controls that show rolling performance. For example, in this next image, this query is used within another query to return rolling measure instances (both the element and measure type can be pinned making this a widely reusable query construct).
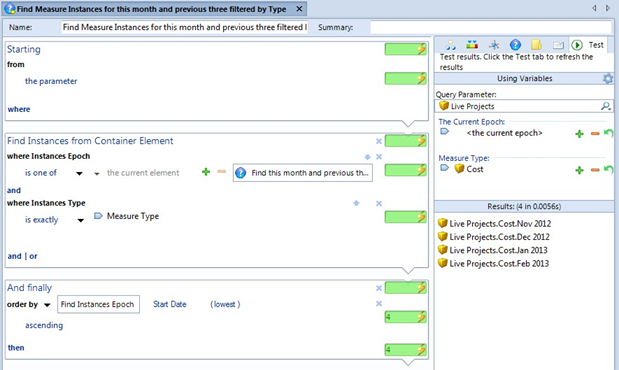
Note: The preceding examples use epoch related Find blocks, and an And Finally block to order the epoch measure instances
Setting the current epoch
As mentioned, the current epoch typically defaults to the current month. However, you can control this:
- The Configure Epochs dialog box lets you set the current epoch from a query executed each time the repository is accessed. See the next section for details on this dialog box.
- In the top right corner of the Business Architect window, click Current Epoch. This lets you change the month that Business Architect is using as the current epoch.
- Many panels include The Current Epoch on their Inputs tab (on the flip side). You can pin this to an element or control. Typically, The Current Epoch field is accompanied by a plus or minus epoch modifier. This is plus or minus the epoch’s unit (months or years), or for custom epochs, relative to its position in its epoch group.
- There is a Current Epoch session variable that you can use in Active Enterprise solutions. Add the Session Variables action panel to a model to access this.
The Configure Epochs dialog box
As shown in the next image, to display the Configure Epochs dialog box, in Business Architect, click File, point to Manage Repository, and then click Configure Epochs.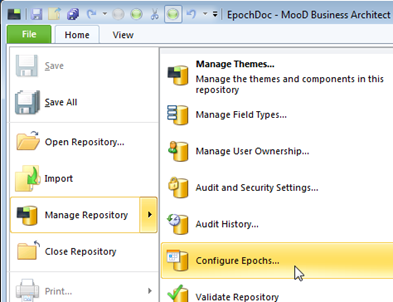
This next image shows the Configure Epochs dialog box.
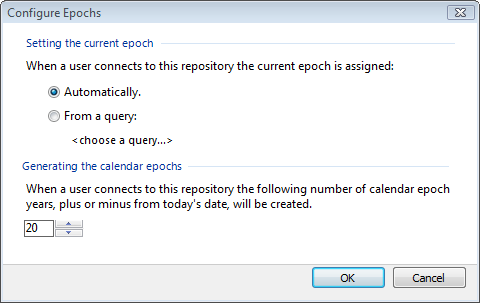
You can do two things:
- Specify a query that will set the current epoch. Automatically means set it to the current month (the default setting).
Control the range of epochs that are created (and hence available) within the repository. By default, MooD creates calendar (month and year) epochs for 20 years either side of today’s date.
Note: If you delete epochs that are within this range, they will be recreated the next time the repository is accessed.
Before you can make use of epoch measure instances in queries, aggregations and such like, you must create and apply epoch aware measures. You apply epoch aware measures to elements.
Creating an epoch aware measure
Important: You cannot change a non epoch aware measure type into an epoch aware one. You must always create a new epoch aware measure type.When you create a measure type, follow the standard process but ensure that the Each measure will use an Epoch setting is selected, as shown here: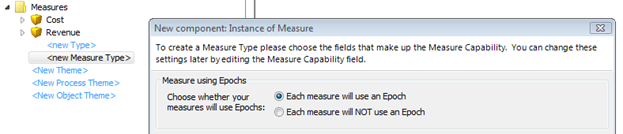
About applying epoch aware measures to elements
Once you have epoch aware measures, you can apply them to elements. You can do this:
- Manually in Business Architect by dropping the epoch aware measure into a valid measure relationship field. At this point you select what epochs you want measure instances created for.
o Element inheritance is important here. When you add a measure to an element, you can choose to apply the measure to current and future descendant elements.
o Regardless of which epochs you select, there is always the concept of the current epoch.
- With a degree of automation using SAT. You can use synchronizers to apply measure instances to elements. Specifically:
o The Excel Import synchronizer has two layouts Epoch Grid and MooD Measure Instances specifically designed for different spreadsheet structures. These produce record descriptions that can be used with the Measure Instances target. This target is specifically designed for mapping to measure instances including epoch aware ones. There are also Month Epochs, Year Epochs and Custom Epochs targets available.
o The Create Measures synchronizer creates measure instances on elements. This works with both epoch aware measures and standard measures. This was introduced in MooD 15 Build 57.
o The Copy Measures for Epochs synchronizer lets you copy the existing measures from one epoch to another epoch, thereby creating the same measure instances in another epoch. Note that in MooD 15 Build 56 and earlier, this synchronizer was called Create Epoch Measures.
Manually applying epoch aware measures in Business Architect
When you have an epoch aware measure type in the Explorer Bar you can apply it to elements that support a relationship to that measure type. This creates measure instances on that element. At this point, provided the measure type is epoch enabled, you choose which epochs you want to create measure instances for. The task that follows covers this and explains some of the key points. It assumes that you have epoch aware measures available to apply
Task 1 To manually apply a measure to an element:
- Using the Explorer Bar, find the element to be measured and open its element definition.
This element definition should include the measure relationship field for the measure type you want to apply.
- Drag the measure from the Explorer Bar and drop it into the measure relationship field.

These first two steps are illustrated by the preceding image showing a Project Cost measure being applied to the Porus element. Financial Metrics is a measure relationship field on Project elements that allows the measure type that the Project Cost measure has been created from.
Note: Below any measure relationship field you can click Add measure to select from a list of measures, or Browse to filter the Explorer Bar by applicable measures.
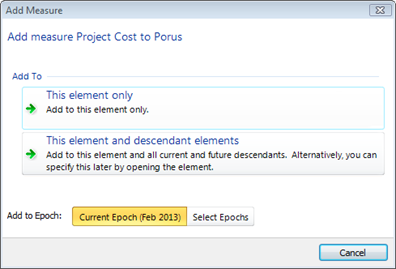
As soon as you apply a measure, you get the Add Measure dialog box shown here.
Note: If the dialog box doesn’t include Add to Epoch, you have applied a measure that is not epoch aware.
Key points about this dialog box are:
- Under Add To, the two This element buttons do the action immediately. If you click either before you have selected your epochs, you will need to remove the measure instance and then reapply the measure in order to select the epochs you require (i.e. get back to the Add Measure dialog box). To remove a measure instance, use the Remove command under the element’s measure relationship field.
o Although the second button gives an alternative, note that this alternative only affects future descendant elements not current descendants. The misleading text has been recorded as an issue. Step 5 includes more information on this.
- The Add to Epoch section always defaults to Current Epoch.
- Click Select Epochs.
The Add Measures dialog box expands as shown here. Only the current epoch is selected.
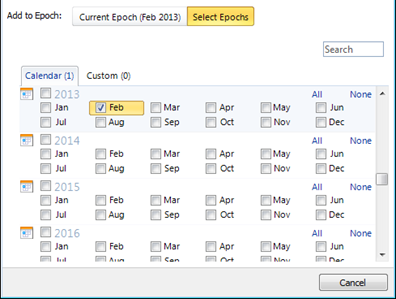
4. Select the epochs that you want to create measure instances for.
On the tab for each epoch group, the number in brackets denotes the number of epochs selected in that group.
- Do one of the following:
- Click This element only to create measure instances on this element only.
- Click This element and descendant elements to create measure instances on this element and on all of its descendants including future descendants.
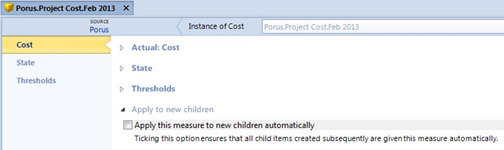
Note: Although the button for This element and descendant elements states that you can specify this later by opening the element, this alternative is for future descendants only. It will not affect existing elements. To access this functionality you need to open the element and then open the measure instance. This gives you access to the Apply to new children setting shown here:
To automatically apply measure instances to a group of existing elements, you can use the Create Measures synchronizer. This would allow you to correct occasions where you have mistakenly selected This element only.
When you click either button, the measure instances are created for the selected epochs and applied to the affected elements (they will appear in the measure relationship field that you dragged the measure into in step 2).
If you clicked This element and descendant elements and there are lots of descendant elements, you’ll see a progress dialog box as the measure instances are created.
If you would like to read more on this matter, please click the link attached.
Comments
0 comments
Please sign in to leave a comment.