
A measure quantifies some aspect of performance. Measures are applied to elements and have a value for that element. Each measure compares its value against a threshold to produce a state. This state is a value from a Pick list. For example, a Cost measure compared against some financial thresholds to produce a RAG (red amber green) status. This could then be used in models to quickly and effectively convey performance.
Glossary
This glossary should help you differentiate the various terms used in this document and within Business Architect.
Table 1. Measures glossary
|
Measure |
A measure is created from a measure type. A measure is what is actually applied to elements. Measures are elements and are listed in two places in Business Architect: · The Explorer Bar, under Themes, within your Measures (or equivalent) theme. · The Performance library. Measure can also be used as a general term for the whole process of gauging performance within MooD. |
|
Measure type |
The structural and behavioural definition of a measure. Measure types are created in theme administration. |
|
Measure relationship type or Measure relationship |
Collections of one or more measure types. Within a theme, when you define a type (element) that you want to apply measures to, you add a Measure field to its type definition. This field is set to a measure relationship type and thereby defines what measures can be applied to elements of that type. This means that a single field on an element can hold measure instances based on all the measure types referenced by that measure relationship. A measure type can be used in more than one measure relationship. |
|
Measure instance |
The application of a measure on an element. The measure instance holds the measure for that element. It holds an Actual value, a threshold, and a Pick list state produced by comparing the Actual against the threshold (the Pick list used is defined in the measure type). |
|
Default measure instance |
A set of defaults that can be applied to measure instances. When there is a default measure instance, any measure instances created on an element inherit these defaults. You can set defaults for the Actual value and the threshold. |
|
Threshold |
A set of criteria that determine the status of a measure instance. The measure instance’s Actual value is compared against the thresholds to produce a Pick list state for that measure instance. The Pick list used is set in the measure type, but the applicable threshold is set at the measure instance level. Usually this is by inheritance from the default measure instance, but thresholds can also be set at the individual measure instance level. This gives you a fine level of control over the thresholds used to determine the Pick list state on a measure instance. |
|
Activator |
An activator lets you derive the measure instance Actual value from a calculation or an external source. You can choose from a selection of Activators, for example, Aggregation Activator, Excel Activator and SQL Server Activator. |
Setting up measures – the seven stages
This section assumes you are familiar with the various definitions in the glossary. The diagram is followed by a description of the overall process, and then specific sections for each stage.
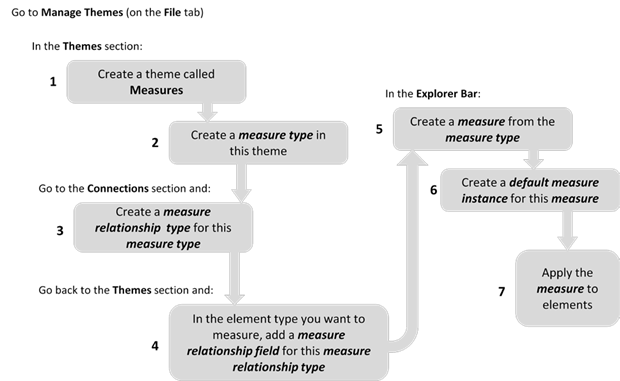
Figure 1. Setting up measures
Before anyone can apply measures to elements, you (as repository administrator) must configure measure types and make sure your themes (elements) can use them. This is the first four stages in the seven listed here. For this, you will use the Manage themes of elements and connections between them dialog box (on the ribbon, click File, and then click Manage Themes).
The seven stages to setup measures are:
- Create a Measures theme.
- Create a measure type within the Measures theme.
- Create a measure relationship type for the measure type (or add the measure type to an existing measure relationship type).
- In the theme that you want to measure, add a measure relationship field to the element type definition.
This field is set to a measure relationship type (and will have the same name). This is the field that will hold the element’s measure instances once a measure has been applied to the element.
|
A quick way to complete stages 3 and 4 |
|
There is a quick way to accomplish stages 3 and 4 at the end of stage 2. However, it has the consequence that it always creates measure relationship types called Measures, and always adds fields called Measures to the element type definitions. Unless you rename everything, this is a maintenance issue. |
At this point you leave the Manage themes of elements and connections between them dialog box and return to the main Business Architect interface to complete the three remaining stages.
- In the Explorer Bar, create a measure from your measure type.
- Create a default measure instance for the measure. This is optional, but recommended. This section includes subsections on activators and thresholds.
- Apply the measure to an element to create measure instances on that element.
Seven corresponding sections and tasks follow. The example used throughout creates a Measures theme, a Cost measure type from which a Project Cost measure will be created, and a Financial Metrics measure relationship type. It configures a Project theme so that its elements can use Cost measures by means of a field called Financial Metrics. The sixth task adds the optional defaults, and the final task applies the Project Cost measure to an element. This assumes that you are the repository administrator, and that you have a theme called Projects. Any other prerequisites are defined before the task concerned.
|
The benefit of measure relationships |
|
Users sometimes ask why, when you add a measure field to an element’s type definition, you don’t just select the measure type, and instead have to set up and then add the field as a measure relationship. The basic reason for this is structural flexibility. This is twofold: · Measure relationships can include multiple measure types. · Each measure type can be included in multiple measure relationships. This makes measure types reusable, and lets you hold different measure types within a single measures field on an element. For example, you could have the following measure relationships: · Financial Metrics that can hold Cost, Fixed Cost and Revenue measure instances. · Costs that can hold Cost and Fixed Cost measure instances. · Revenue measure relationship that can only hold Revenue measure instances. |
Stage 1 ─ Create a Measures theme
You must have at least one theme to create your measure types in. This theme can be called anything, but typically it is called Measures.
Task 1 To create a theme called Measures:
- In Business Architect, click File, and then click Manage Repository.
This displays the Manage themes of elements and connections between them dialog box. This is the dialog box for all theme administration (your repository’s Meta model). It opens at the Themes section and all the themes in your repository are listed on the left side.
2 . Click <New Theme>.
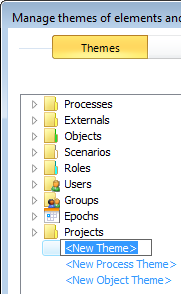
It becomes editable.
- Type Measures.
- Click white space (anywhere outside the renaming box but inside the dialog box). This creates the Measures theme.
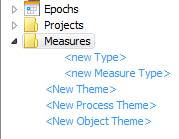
You can now add some measure types to the Measures theme.
Note: You can create measure types within any theme. For example, if you have a Project theme that defines project related element types, you could create all the project related measure types within it. However, in practice, measures are frequently located together under one universal theme. This guide follows this principle with its Measures theme.
If you'd like to learn more about the matter, click on the attachment.
Comments
0 comments
Please sign in to leave a comment.